Saturday, September 28, 2013

Accessories Pictorial with Frosted Glass Hand Ring Holder


Saw this frosted glass hand design ring holder while shopping for materials. I got one and not sure
what to do with it since I prefer my rings in jewelry box and organizer rather than outside. 
Later find out that its good to showcase my bracelet here as well. 
I turn it upside down and a throw pillow supports it.
Checked below the pictorials of my bracelets and rings.


*** dReaM, CreAte, InsPire ***

*** Craftaholic Pinay ***

Yellow Beads Version of Dreaming of Turquoise Design


I have an extra yellow beads  from recent project and one heart shape swarovski crystal beads so decided to make another beads with similar design as Dreaming of Turquoise I designed previously. 
Misses doing tutorials and kinda busy with work and catching up rest and attending my blossoming lovelife. 
Sure, girls life is busy but we prefer being busy than doing nothing, isnt it ladies?

Humming old love songs right now, oh I wanna share to you all that I am so in love thus I was inspired to create an accessory that speaks love. So watch out for another tutorial about beaded wedding cord I make for my younger-sister's wedding this December.

Stays pretty ladies.

*** dReaM, CreAte, InsPire ***

*** Craftaholic Pinay ***

Sunday, September 1, 2013

Yellow Beads Stretchable Bracelet with Crystal Beads and Leaves Charms Accent


Cool YELLOW is the inspiration for this bracelet.
(Credits: Photos from Google Images)


Materials above.


Procedures from left to right.


Finished design.


Pictorial.

*** dReaM, CreAte, InsPire ***

*** Craftaholic Pinay ***

White Stones Crochet Necklace


 I wasn't able to make step-by-step tutorial for this one but if you have basic knowledge with
crocheting, this one is very simple to create.

Wore this during summer coz the stones are cold around neck area and the yarn can be washed if it 
gets dirty. Unlike necklaces made of metal, you can go dive in sea water without to worry about tarnishing.

Materials are bead stones with hole on top part, a ball of Monaco mercerized cotton crochet thread and a crochet hook with small tip.

*** dReaM, CreAte, InsPire ***

*** Craftaholic Pinay ***

Sunday, August 4, 2013

Dreaming of Turquoise


I'm a big fan of Turquoise color. Its relaxing, its soothing. It reminds me of the sea, of an unspoiled beach, 
of a clear sky, of a delicious cocktail, of a lovely bunch of Hydrangea flowers, of a feminine prom gown, of an elegant turquoise gem on a ring.

Here are the materials and procedures from the inspiration above.
Stretchable nylon, needle, bracelet pendant connector, jump ring, turquoise designed-beads,
genuine swarovski bead for ultimate sparkle (I prefer mine heart shaped).

Put nylon on the needle. First place the bracelet connector, the reason for this is that we can hide the
nylon end inside the connector giving the bracelet a clean look. Then place the beads. I used 10mm round
turquoise-designed beads for this bracelet. Check the bracelet circumference around your wrist.
Secure the nylon end and hide it inside the bracelet charm connector (no proof then that you just tie the ends). Place the heart-shaped swarovski crystal bead in a jump ring. Attached the jump ring to the bracelet-pendant connector.


Pictorials of my creations.


Here's the finish project and oh my, I love wearing this one.


*** dReaM, CreAte, InsPire ***

*** Craftaholic Pinay ***

My First TV Appearance


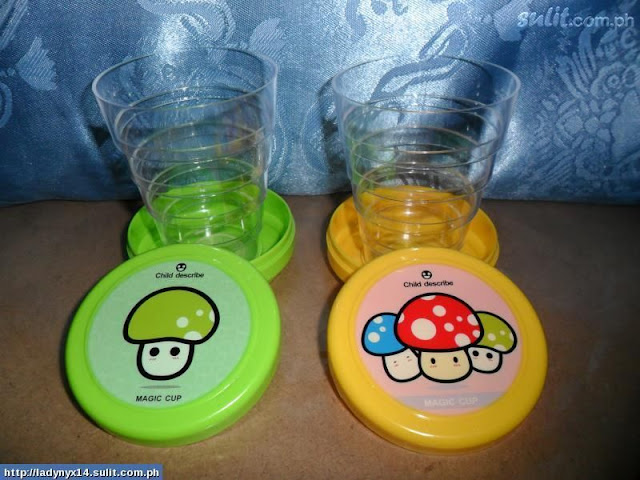
These "foldable magic cups" are my babies. I simply found them hanging on a store shelves and I got a pair for myself that I could used in my travelling and mountaineering activities. I have this habit of munching anytime of the day when I am travelling and so thirst follows which forced me to buy bottled water. However, even if I had a bottled water with me, I automatically and always threw them on the bin then I finally realized I still need them throughout the day. Oh, that always happened and it sucks because I need to buy another bottled water. With this foldable cups, I simply put if in the body bag and when there's a free mineral water in ports I could drink since I have a cup of my own, sweet. Aside from that, I found it hygienic when I am drinking alcoholic drinks with the group since I have my own shoot glass for myself. (Arte but hygienic, LOL) 

After I posted it in my online shop I received orders right away. Moms bought it for their kids, others as a ready glass for those under medication when they have to drink medicine at specific time of the day and mostly, travelers, backpackers, hikers and mountaineers that used the cups for similar purpose as mine and as a gift to fellow mountaineers.

Last June 24, I received a message from a GMA News researcher named Miah and she's inviting me for an interview regarding foldable items they could feature on one of their segment in Good News with Vicky Morales. Of course I don't believe her right away. Imagine receiving a message saying she is a TV researcher and asking if I'm available for an interview to present my item for their segment. However, she is very polite, assuring and consistent with her words that I finally agreed to meet them. They picked me up in front of Jollibee in East Avenue and shoot the scene in Teacher's Village Subdivision. It took only seconds for me to answered another researcher's interview and my first time to used lapel. I stayed in the location for several more hours because I am curious how they make segments. I also have a fantasy of creating a documentary segment ala Howie Severino and this is good starting lesson to make myself comfortable with lapel, big camera and working with these professionals.


We finished the interview and location acting shoots early night and the guys dropped me inside the GMA Compound. It was a good experience and kinda not believable since my humble "babies" are merely insert in my online shop which is then primarily selling beads. Mia and the guys said the cups are really cute that's why she liked it. I told her that her style of contacting people for interview was kinda frightening considering lots of scams we have right now, she said she's used to it. The other online seller she invited aside from me even called GMA Network just to make sure he is dealing with a real people and real employee of the TV Network which confirms she is indeed working for Good News show. Okay, so next time always confirm the researcher's background before meeting them for safety. Who doesn't want to be on National TV? Of course we want it, but let's keep ourselves safe, okay guys?

So here's the segment which I participated and launched my first TV appearance. Yehey! Mama bragged it to some relatives but the segment was aired two more weeks after my interview. Even at the office, I already told my workmates so they could watch, oh boy I was so excited to see myself on television. The entire family sat tight in our living room waiting for my turn that actually just took seconds but for me its eternity and God's cute gift.

Thanks Miah and GN team and Good News with Vicky Morales show. Looking forward for more TV appearances and more benta online. Happy Day!!


Youtube Link for this segment: http://youtu.be/ZoSY24SxDl8 (July 7, 2013 segment)

*** dReaM, CreAte, InsPire ***

*** Craftaholic Pinay ***

Calling Card Design Turned Online Store Photo


I will be using this as the last image for my online shop; www.ladynyx14.sulit.com.ph to give my 
buyers idea how I look like and important details such as mobile number, websites and 
Facebook page.

Still thinking of a calling card design because last time when I brought my magic cups items for TV5 Good Morning Club foldable items segment, a woman asked for a calling card and I don't have any to give her.
I never thought I badly need one just until that time.

I found a kiosk in SM Megamall A that makes calling cards; uEDGE and hopefully I could came up with
my own design that I could bring to them and have it printed.

*** dReaM, CreAte, InsPire ***

*** Craftaholic Pinay ***

Friday, July 26, 2013

Earring Design E2013-01


I saw this design from a friend's earring and tried copying it. I prefer my beads faux pearls to exude simplicity and elegance though minimalist in size and it works its magic in my wardrobe. 

Materials: Pliers and cutters, fish hook earring wires, head pins, beads.

Procedures: Start from second row. Place beads on six head pins. Using round tip pliers, make circle on one end of the head pin. Place the second head pin and repeat procedure on the third head pin. Place earring body to fish hook wire. Make the other pair. Place in earring holder and pack in clear ziplock bag.

*** dReaM, CreAte, InsPire ***

*** Craftaholic Pinay ***

Sunday, July 21, 2013

Old Party Shirt Turns Sexy Swimsuit Cover Ups


I used this white see-through shirt when partying before but of course time came and I no 
longer want it for that purpose.
Since I am also a beach-goer, I decided to turn it to swimsuit cover-up rather than disposing it 
completely. I like the fabric so much because it's soft and comfortable and when wet, it hugs my 
body shape, giving a sexy silhouette.
To create your own cover-up, find old shirt with soft, light fabric and if you can find a 
see-through one, much better.
I cut the sleeves of my shirt, then I also cut the neck area. If the fabric stays together you no longer need to 
sew them. This is originally a round, high neck shirt so I cut the front part of the shirt deeper giving it a V shape til' it reach somewhere in the middle of my bust area. Reason is I still loved wearing necklace even when I am swimming and I won't sacrifice that piece of fashion statement and so this DIY cover-up allows me to show my summer necklace.
I used the fabric I cut a little later, gathered the fabric on one shoulder area and sew it. The finish item is at the middle of the photo. Since its made of light fabric, this cover-up dries fast when I get out of
the water and I could walk on the beach without calling much attention.
Save some bucks for this project so buy pasalubong instead.

*** dReaM, CreAte, InsPire ***

*** Craftaholic Pinay ***

Monday, March 25, 2013

Air21: Online Sellers Business Partner


If your're an online seller, one of the things you must consider is which courier to entrust your shipment.
Now that's not something we must be serious about coz failure of shipping sabotage
our reputation which loosely based on trust from people and customer who barely know us and we might eventually lose clients and damage our business and business name if we take it lightly.

Since I started online selling, I go with Air21 services.  I specifically liked their Door to Door Sulight Packages which fits most of my shipment that weight around 1.50 to 4 Kilos.

Compare to small couriers we have around now, Air21 is still a bit pricey but considering the reliability of it, 
I still prefer their service. I learned in the process that most clients, specially those who are excited with their purchases and provincial transaction are not really much concern if they pay a bit higher as long as we could be trustworthy as well, deliver them what they pay for. 

I dropped them at my favorite Mail n More branch in Tiendesitas, Pasig and if the attendant tell me it will be a day or two days shipment, I am confident to inform my buyers that their shipment are on the way with that exact time frame. No worries, I could relax and I like it very much. 

I basically like the text service that I and my clients received informing us when shipment will be deliver and on my end, if the shipment was already received by my clients. Again, I am after punctuality, reliability and speed transaction. I have a regular work and busy doing other stuffs and I hate services that consumes my precious time. 

Visit their website, www.air21.com.ph and check the Sulight Packages that might suit your needs; http://www.air21.com.ph/main/sulight.php

Like what I wrote in my collage photos above, enjoy what matter's most in life like fun, activities, pursuing passion, work, family, friends and me-moments because Air21 will guarantee they will take good care of our shipments the way we care for our businesses.

Kudos to Air21, Online Sellers Business Partner.


Love,

Lady Nyx of www.craftaholicpinay.blogspot.com

www.ladynyx14.sulit.com.ph

www.facebook.com/craftaholicpinay


*** dReaM, CreAte, InsPire ***

*** Craftaholic Pinay ***

Sunday, March 17, 2013

Pillowcases Galore!


Make your own pillowcase!


*** dReaM, CreAte, InsPire ***

*** Craftaholic Pinay ***

Three Heart Charmed Bracelet


This bracelet spells L-O-V-E !!

Materials/Procedures:
1. Chain
2. Pliers and cutters
3. Heart charms
4. Bracelet lock
5. Metal rings
6. Place metal rings on bracelet lock.
7. Attach chain on the lock
8. Attach another pair of the lock in the chain. Secure.
9. Attach heart charms on the chain

*** dReaM, CreAte, InsPire ***

*** Craftaholic Pinay ***

White Ice-Like Beads Bracelet in Chain


White beads look like round ice, cool, relax and speaks of elegance.
Make this bracelet and get in the vibes ala Ice Princess.


Materials/Procedures:
1. Chains
2. Pliers and cutter
3. Bracelet lock
4. Head pins
5. Metal ring
6. Beads
7. Place one metal ring on one bracelet lock
8. Attach it to the chain
9. Attach chain to another pair of bracelet lock
10.Take head pins and beads
11.Put beads on the head pins
12.Cut excess metal and fold metal pins
13.Attach head pins with beads in the chain (see finished item above)


*** dReaM, CreAte, InsPire ***

*** Craftaholic Pinay ***

Ear Accessory Turned Necklace Pendant


The pendant in this necklace is actually an ear accessory. Its just it doesn't perfectly fit my ear and so I have to do something to make it useful.
The antique-color of the metal and the intricacy of the rose and leaves detail makes it perfect
as pendant. 
I used a necklace chain with the same color and voila, I have a new vintage-inspired necklace.

*** dReaM, CreAte, InsPire ***

*** Craftaholic Pinay ***


Saturday, March 16, 2013

White and Green Beads Bracelet


This bracelet is so simple.
Few materials and easy instructions.
Create one for yourself.

Materials/Procedures:
1. Stretchable nylon cord
2. Needle
3. Head pins
4. Primary beads (mine are white faceted crystal-like plastic beads)
5. Secondary beads (small green beads)
6. Place primary beads in nylon.
7. Place small beads in head pins. Make a round knot on top of the beads
8. Put three small beads in the cord for every three big white beads. Repeat procedure until you complete the bracelet.
9. Finish item.

*** dReaM, CreAte, InsPire ***

*** Craftaholic Pinay ***

Wednesday, March 13, 2013

Triple Bracelets Set


Can't have enough with just one- then make three.
These simple but cute bracelets are so easy to create.

Materials/Procedures:
1. Stretchable nylon cord
2. Needle
3. Beads 1
4. Beads 2
5. Lace
6. Put beads 1 in stretchable nylon cord and secure.
7. Put beads 2 in stretchable nylon cord and secure.
8. Alternately place beads 1 and 2 in single cord and secure
9. Gather the three bracelets and held together with lace.
10. Finish item. Wear them with your cutest baby pink doll dress. Enjoy!


*** dReaM, CreAte, InsPire ***

*** Craftaholic Pinay ***

Pink Stretchable Bracelet


Simple stretchable bead bracelet.

Materials/Procedures:
1. Stretchable nylon cord
2. Needle
3. Pliers
4. Primary beads
5. Smaller beads and head pins
6. Bracelet metal findings
7. Place bracelet metal findings first. The hole inside of it will hide the end of nylon when we locked it.
8. Place your choice of beads.
9. Secure nylon ends.
10.Place two smaller clear beads and one primary bead in head pins.
11.Cut excess metal using cutter and twist using pliers.
12.Place beads on the bracelet metal findings.


Put in a zip lock as packaging. Sell or give as a gift to friends and love ones. 

*** dReaM, CreAte, InsPire ***

*** Craftaholic Pinay ***

Mother of Pearl (Nacre) Shell Beads Stretchable Bracelet


Another summer accessory perfect for beach and swimming in sea water won't affect this 
one either. No tarnishing and itchiness, and that's how we want our escapades to be. 
Go and create your own.
Wear it with your favorite straw hat and comfy sun dress. Enjoy the sun and sand!!


Materials/Procedures:
1. Stretchable nylon cord
2. Nacre or Mother of Pearl beads
3. Needle
4. Sew beads together. (Add other beads/materials you prefer if you want).
5. Finish item. 

*** dReaM, CreAte, InsPire ***

*** Craftaholic Pinay ***

Nail Polish as Clothes Marker


If you are living in a shared apartment or room with people not your relatives, you must experience what its like to lose your personal property such as clothes hangers in your closet when someone simply took it or used it for their laundry.

Here's how to retrieve your stuff just in case you need it for yourself and avoid discussions when
the other person think it is theirs.

Mark at the top portion of the clothes hangers if you think you will be using it too for white clothes. I have mine at the bottom coz I don't want the marker too visible. 


Materials/Procedures:
1. Clothes hangers
2. Nail polish or paint
3. Marked  the clothes hanger with your choice of color of nail polish. Let it dry. This will be your marker in them.
4. When you need to retrieve them, tell them you place all your stuff with the same mark. Show the rest as a proof.

*** dReaM, CreAte, InsPire ***

*** Craftaholic Pinay ***

Sunday, March 10, 2013

Cross Charmed Bracelet


Create this simple but chic cross charmed bracelet.

Materials/Procedures:
1. Chain
2. Cross Metal Findings
3. Bracelet Locks
4. Metal Rings
5. Cut enough chain as the base of your bracelet.
5. Get one pair of the lock and,
6. Attach metal ring
7. Attach the lock in the chain
8. Since this design of cross already has a round top, open part of the chain where you will place the cross
9. Place cross metal findings
10.Add metal ring on the other end of the chain
11.Attach the other half of the bracelet lock.
12.Enjoy your new design.

*** dReaM, CreAte, InsPire ***

*** Craftaholic Pinay ***

Impromptu Sea Shells Bracelet


I made this sea shell bracelet in Dampalitan Island from the shells abundant in the beach.
My initial plan was to make a kite from the twigs in the area,but I bought crepe papers instead of japanese paper and so my dream kite flying wasn't successful and thought of making a bracelet instead. 
I got bored from waiting for the rest of the guys to return for they checked the other side of the island where a pond raising shrimps was located.
When they returned, I already had a new accessory for next day adventure to Borawan Island. Cool!

From this experience, I learned that dried shells away from the sea water are easier to poke hole in it but breaks easily while those still in the water are harder to poke hole but less fragile. I recommended the latter.

Materials/Procedures:
1. Gather shells, thread, knife and rock.
2. Poke hole in the shells.
3. Cut enough thread and place shell alternately.
4. Make an adjustable knot.

*** dReaM, CreAte, InsPire ***

*** Craftaholic Pinay ***

Saturday, February 23, 2013

Wooden Bracelets Set


Another Borawan/Dampalitan trip accesorry. 
Primary material is wood to capture that tropical feeling. 
Coated with colorless nail polish to protect the color of the wooden beads. 
I gave two of these to a cute little girl in the area.

Materials/Procedures:
1. Stretchable nylon cord
2. Needle
3. Colorless nail polish
4. Light colored wooden beads
5. Dark colored wooden beads
6a. Gather light beads and make single strand of it.
6b. Finish item.
7a. Gather together dark wooden beads and make another single strand.
7b. Finish item.
8a. Alternate placing lighter and dark beads in the cord.
8b. Finish item.
9a. Place dark bead after every three light beads. One or two more rounds of nylon to secure bracelet. 
9b. Finish item.
10. Coat with colorless nail polish. One side first, air dry and coat another side. 
11. Wear as a set. Enjoy!!

*** dReaM, CreAte, InsPire ***

*** Craftaholic Pinay ***

Tuesday, February 12, 2013

Green Zig Zag Necklace Goes to Dampalitan and Borawan Islands of Quezon Province


My green necklace matches perfectly the places I recently visited. Dampalitan Island with its pine trees planted shore and Borawan Island with plants and trees growing on the rocks.

I was able to wear the necklace the whole two days without causing inconvenience on my part. It seems I picked the right beads and materials this time. The round shape but flat surface green beads sits
perfectly in my chest, its not causing any friction at all. Happy with my creation. :)

Check the rest of my adventures at my personal/travel blog www.ladynyx14.blogspot.com
I will try to compose the article as soon as possible.

Summer is just couple of months away. What will be your summer accessory this year?

*** dReaM, CreAte, InsPire ***

*** Craftaholic Pinay ***

How to Tie an Adjustable Thread Knot as Lock for Necklaces and Bracelets


This is the lock of my green zig zag necklace. When I am using a necklace for swimming, I don't like any base metal findings in my accessories to avoid skin allergy specially near neck area. 
This adjustable thread knot could be use to bracelets, as well. 

Tutorial:
1. Work with thread facing you this way. You won't move the left thread. Only the right thread will be moving.
2. Move right thread under left thread.
3. Now, the same right thread must be above the left thread.
4. The right thread is now back to the right side. Place it under right thread.
5. Pull right thread to the middle. Place right thread above the same right thread, then under the same right thread at the bottom part nearest you.
6. Pull together to close. The left thread will be the part moving here coz you keep it straight all throughout the process. Try pulling the left part thread to loosen and tighten your necklaces and bracelets.

*** dReaM, CreAte, InsPire ***

*** Craftaholic Pinay ***

Zig Zag Necklace Design


This is the necklace I made (rushed) for my Dampalitan/Borawan Islands trip.
I knew we will be swimming in sea water and so I need one that is not made of metal. The Monaco crochet thread is perfect for this necklace. I want one I could wear all throughout my trip. 

Materials/Instructions:
1. Get beads with holes near at one side (not in the middle) to get this zig zag design.
2. Smaller beads. I choose cats eye coz it doesn't fade easily, its smooth and it won't be affected by sweat. 
3. Black Monaco crochet thread. 
4. Place cats eye beads on the thread.
5. Tie both ends.
6. Place your primary beads. Decide how long it will be. Mine was bigger coz I want to emphasize it when I wear it.
7. Tie to close.

*** dReaM, CreAte, InsPire ***

*** Craftaholic Pinay ***

Friday, February 8, 2013

Valentines Day Bracelets


One more week and its Valentines Day. Not sure if I will have a romantic Vday date this year but just in case, better ready my outfit which includes this beautiful, hand-made stretchable red bracelets. I made three bracelets from one string of beads and with just nylon and spacers, I was able to complete this set. 

So ladies, like me, wear your cutest dress, slip those red high heel stiletto shoes, swipe a vamp lipstick, grab a delicate pouch and wear this uber red bead bracelets. 

On a Valentine's day, with or without a romantic date, be at your best.

xoxo,

Lady Nyx of Craftaholic Pinay


*** dReaM, CreAte, InsPire ***

*** Craftaholic Pinay ***

Thursday, February 7, 2013

Red Beads Bracelet with Several Metal Spacers


Materials/Instructions:
1. Stretchable nylon cord
2. Metal spacer 
3. Red beads
4. Needle
5. Place cord in the needle
6. Alternately put beads and metal spacers.
7. Tie one end and another round of nylon for stability.
8. Finished design

*** dReaM, CreAte, InsPire ***

*** Craftaholic Pinay ***

Simple Red Beads Bracelet with Metal Spacers


Materials/Instructions:
1. Stretchable nylon cord
2. Metal spacer "flower design"
3. Red beads
4. Needle
5. Place cord in the needle
6. Place spacer
7. Alternately put beads and metal spacers.
8. Finished design

** dReaM, CreAte, InsPire ***

*** Craftaholic Pinay ***

Plain Red Beads Bracelet


Materials/Instructions:
1. Stretchable nylon cord
2. Beads
3. Needle
4. Attached nylon to needle
5. Place beads
6. Decide if beads are enough compare to your wrist size.
7. Tie one end.
8. To fully secure beads, have another round of nylon
9. Cut nylon.
10.Finished product perfect for Valentines Day.

*** dReaM, CreAte, InsPire ***

*** Craftaholic Pinay ***

Monday, January 28, 2013

Bead Bracelets Designs from my Online Buyer, Shayne


Woot woot!! Received an email today from my buyer and suprised to see that she actually attached 
a photos of her creations from the DIY kit she ordered from me.

Its been quite a while that I kept on receiving lots of inquiries and orders but she's the first one who
actually sent me images of her finished projects. And oh, we are still communicating and looking forward
for another transaction. 

I'm so proud of my buyers. They know they want to learn bead crafts, they know they are creative and 
they put effort in making their passion possible and that's how they find me; www.ladynyx14.sulit.com.ph

Seriously speaking, I never earned a lot from this business idea. Its just that when I am starting out, I knew 
how hard is it to find materials. When I became familiar with the places that cater them, I thought there
must be more like me who never knew where they could purchase these trinkets.

Some of my clients already visited the places and stores where I purchased my supply but still having issue of what to pick and buy; they goes back to me and order their first DIY kit. Some of them eventually learned to
outsource their supply, others specially those from the province stick with my service.

Some reported back and told me they already sold their first designs, some asked how much they gonna sell it. Others learned the name of the materials one by one.


Its such a joy to find out there are lots of creative people around. There are teens, yuppies, working professional, mothers, business minded women etc. Some orders are within Metro Manila, others came from Luzon, I received inquiries from Visayas, still waiting for orders from Mindanao and finally got an inquiry for 
shipment abroad, which is a delightful news coz I included in my ads that I am only accepting local buyers.
It makes me think I should reconsider accepting international orders. This week I am going to my 
trusted courier Mail n More in Tiendesitas, Pasig to get an idea how much an international shipment 
might cost. After that, I might consider editing my transaction policy. Besides, the main reason
why I posted such ads is to make it accessible to those people. I couldn't isolate my products within Philippines if other people around the world also wants them.It makes me wonder maybe 
it's the same reason why international company must launched sites and branches around the world, there
is a need that must be cater. I felt I found a market void to fill. 
This is the DIY kit she used to make the bracelets above, worth Php1,500.00 including shipment. 
More creative Pinoy and Pinay. More business transactions for me.
Everyday is a learning process and I am learning online business little by little.

Thank you to Shayne of Sorsogon City for the trust. I am proud of you, young woman.

Disclaimer:
Shayne's bracelet designs are posted with permission.


*** dReaM, CreAte, InsPire ***

*** Craftaholic Pinay ***